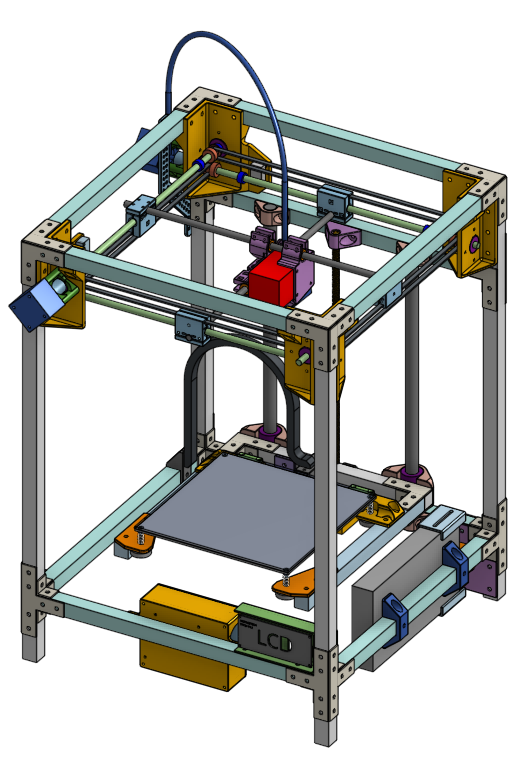
This project is an inexpensive, fully self-designed 3D printer. The design utilizes common off-the-shelf components and 3D printed parts in its construction. This printer is designed to be something that can become a lesson plan, where the design can be broken down into very simplified concepts so that lessons plans can be developed around small steps that accumulate into the realization of a completely working 3D printer.
You, yes, you. If you’ve received a direct invitation to view this project from me, it means you are my friend IRL who I would like to help build this 3D printer. This could mean in-person help, free spare parts, borrowing tools, etc, definitely an in-person safety check. What’s in it for me? You are my test subject. I don’t actually need this printer right now, but I do want to see that my design works! The 3D printing marketplace is constantly evolving and I want to keep up with some new developments. This new design uses the more common 1.75mm plastic filament and all FIVE of 3D printers that I use needs 2.85mm filament, meaning even if I build it, I can’t use any of my existing stockpile of 2.85mm plastic filament. But I have a need to prove to myself that I can design good 3D printer that doesn’t use expensive parts and techniques.
You know me, so I bet you already know it’ll be good. Reply back to my invitation to start.
This website is still under construction, currently it is content complete but still under review and editing.
General Design Overview
- 220 x 220 x 300 (L x W x H) build volume
- uses 1.75mm plastic filament
- uses the E3D Hemera extruder
- uses 2020 profile aluminum extrusion beams for the frame
- mechanical performance similar to Ultimaker 2
- will never need bed leveling after initial calibration
If the part list is fully followed, the electronics features are:
- 12V system main voltage
- 32-bit control system
- Trinamic silent stepper motor drivers
- heated bed, 120W
Click Here to compare it against some other 3D printers, such as my Hephaestus 3D printer which is very similar.
CAD 3D Model
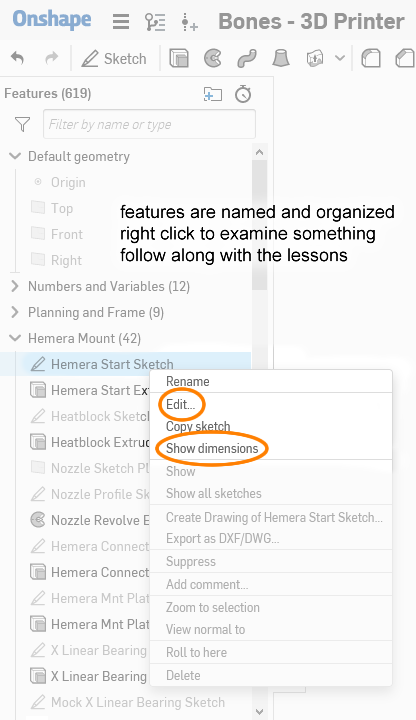
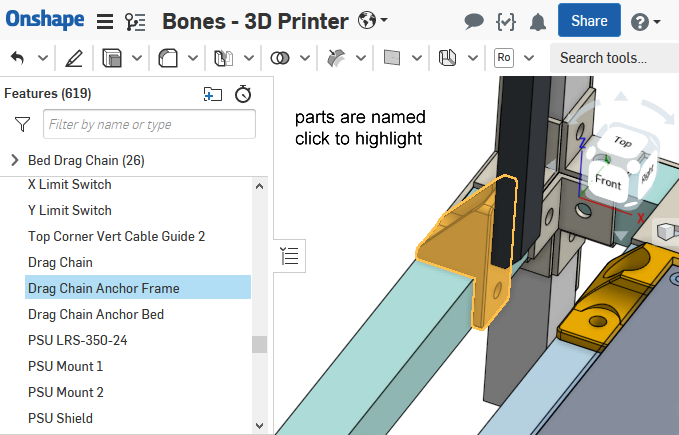
The whole 3D printer was 3D modeled first, almost every single part, using Onshape. This means:
- I can share the design with you, and you can modify it under your own Onshape account
- I can give you CAD homework, and I can check if you did it right, AND I can even check if you cheated, because I can check the file history
- You can design your own custom parts and share it with me, so I can give you feedback
- You don’t even need a computer. Onshape runs in the cloud and accessible through any web browser or their smartphone app
The link to the Onshape model: https://cad.onshape.com/documents/359ba….150f
For additional CAD lessons unrelated to this 3D printer, check out my robotics class, click here, also using Onshape
About the Lessons
There will be parts of the lesson where I take you through steps in CAD to create something, a drawing or a part. But keep in mind, I am not taking through the steps to make an exact copy of the model I just showed you. Instead, each time, I will be simplifiying something that was originally really complicated, to something very easy, and focus on important concepts, instead of exact replication.
The assembly and setup steps are much harder for me to write because… well… I can only guess at the order-of-operations without testing, and I can’t provide photographs. Instructions are given mostly via 2D or 3D illustrations. Please somebody build this printer and send me photos so we can write better instructions!
Table of Contents
- Lesson 0: How this 3D printer works
- Lesson 1: Planning the frame
- Lesson 2: Gantry Design
- Lesson 3: Construction Tolerance
- Lesson 4: Designing 3D Printed Parts
- Lesson 5: 3D Printer Motion
- Lesson 6: Continued Design Tour
- Lesson 7: Part CAD Design Walkthrough (more homework)
- Lesson 8: 3D Printer Electronics
- Extra Lesson: Design an External MOSFET Circuit
- Lesson 9: Assembly Preparation
- Lesson 11a: Electronics Preparation
- Lesson 10a: Mechanical Assembly Part 1
- Lesson 10b: Mechanical Assembly Part 2
- Lesson 11b: Electronics Bring-Up
- Lesson 12: Firmware
- Lesson 13: Software
- Lesson 14: Operating the 3D Printer
- Optional 3D Printed Parts
- Flaws, Mistakes, Improvements
If you have enjoyed this project…
Please consider making a contribution to help cure Alzheimer’s disease.

and maybe contribute your computer’s idle processing power to help finding a cure